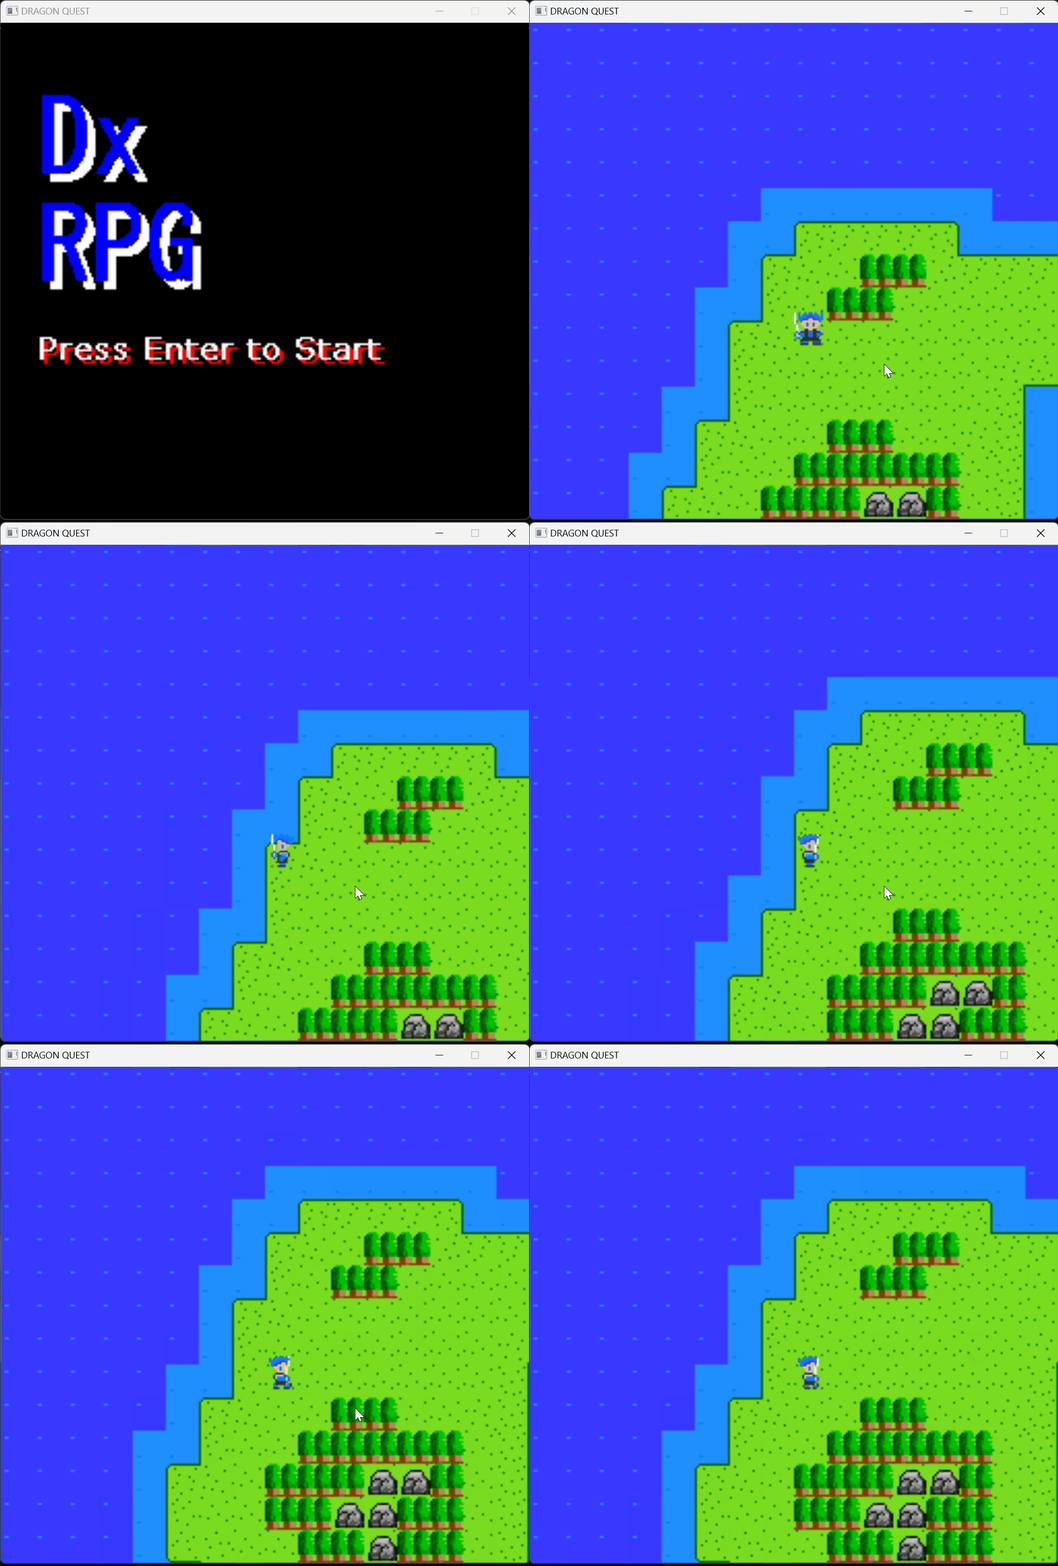
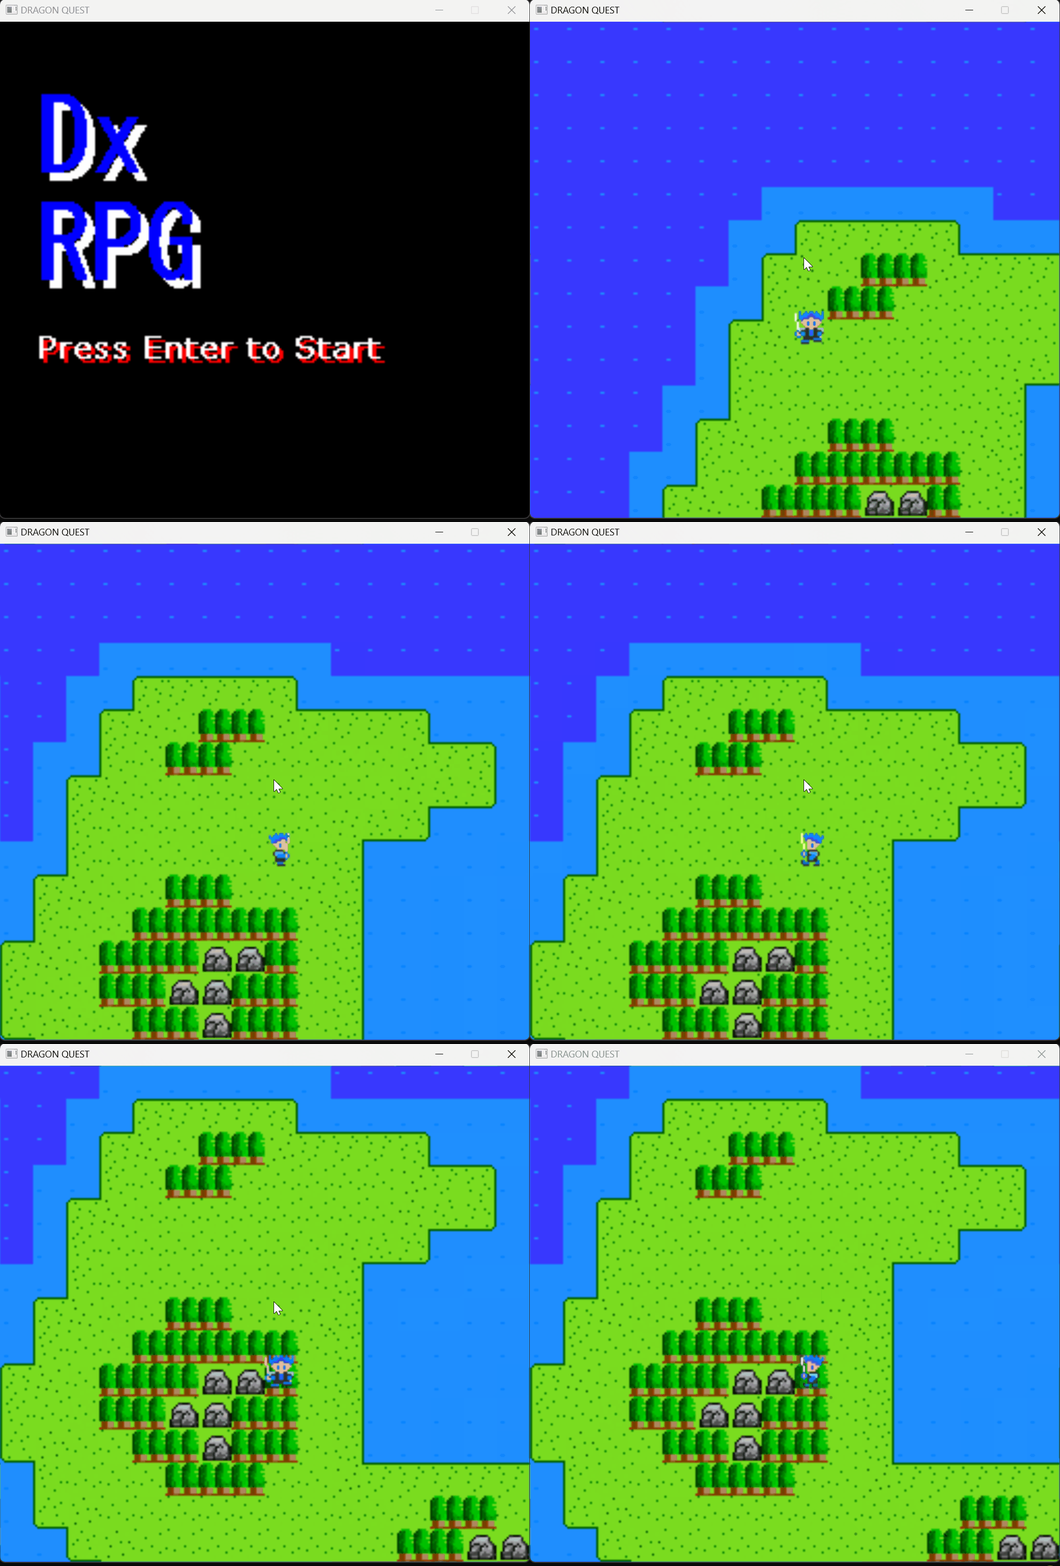
こんにちは。今回は前回作ったステージにプレイヤーを表示して、当たり判定を作っていきます。
プレイヤーの表示とアニメーション
では、プレイヤーを表示していきます。新しくPlayer.hを作成し、PLAYERDRAWクラスを追加します。
#pragma once
/* Player.h */
#include <windows.h>

class PLAYERDRAW
{
public:
	void RealScreenDraw();

	int loopNum = 0;

	int PicMode = 10;
	int dir = 4;/* 1は上,2は左,3は右, 4は下 */
       struct
	{
		int PicMaxU = 2;
		int PicMaxL = 5;
		int PicMaxR = 8;
		int PicMaxD = 11;

		int PicMinU = 0;
		int PicMinL = 3;
		int PicMinR = 6;
		int PicMinD = 9;
	}AniFla;

	int Lat = 0;
	int Lng = 0;

	void BackScreenDraw();
	void Move();
	void MoveAnime();

private:
};

PLAYERDRAW PlayerDraw;

void PLAYERDRAW::RealScreenDraw()
{
	Move();
	BackScreenDraw();
};

void PLAYERDRAW::Move()
{
	if (Key[KEY_INPUT_UP] == 1 || Key[KEY_INPUT_W] == 1)
	{
		dir = 1;
		Lng--;
	}

	if (Key[KEY_INPUT_LEFT] == 1 || Key[KEY_INPUT_A] == 1)
	{
		dir = 2;
		Lat--;
	}

	if (Key[KEY_INPUT_RIGHT] == 1 || Key[KEY_INPUT_D] == 1)
	{
		dir = 3;
		Lat++;
	}

	if (Key[KEY_INPUT_DOWN] == 1 || Key[KEY_INPUT_S] == 1)
	{
		dir = 4;
		Lng++;
	}
};

void PLAYERDRAW::MoveAnime()
{
	switch (dir)
	{
	case 1:
		if (PicMode == AniFla.PicMaxU || PicMode > AniFla.PicMaxU || PicMode < AniFla.PicMinU)PicMode = 0;
		else PicMode++;
		break;
	case 2:
		if (PicMode == AniFla.PicMaxL || PicMode > AniFla.PicMaxL || PicMode < AniFla.PicMinL)PicMode = 3;
		else PicMode++;
		break;
	case 3:
		if (PicMode == AniFla.PicMaxR || PicMode > AniFla.PicMaxR || PicMode < AniFla.PicMinR)PicMode = 6;
		else PicMode++;
		break;
	case 4:
		if (PicMode == AniFla.PicMaxD || PicMode < AniFla.PicMinD)PicMode = 9;
		else PicMode++;
		break;
	}
}

void PLAYERDRAW::BackScreenDraw()
{
	MoveAnime();

	Stage.Draw(Lat, Lng);
	DrawGraph(8 * CELL, 9 * CELL - 4, Picture.Player[PicMode], TRUE);
	Sleep(0.12 * 1000);
};今回のRPGでは、プレイヤーは固定で背景を動かす方式を採用しました。
インクルードしているwidows.hはSleep関数を使うためのものです。
Sleep(止めたい秒数 * 1000);
https://www.google.com/search?q=Sleep
AniFlaはプレイヤーの画像方向のマックス、ミニマムの構造体です。
何に使っているかはMoveAnim関数を見るとわかります。MoveAnim関数でやっているのはアニメーションで、画像が最後の画像なら最初の画像に変えています。(これを向きに合わせてやっている)
Move関数はキーの取得です。第二回で行ったキーの取得が使われています。
DrawGraph(~,Picture.Player[PicMode], ~)はプレイヤーの表示です。Picture.PlayerのインデックスにPicModeを使います。これでPicModeを変更することで画像のアニメーションができるようになります。
変数Lat,Lngは縦方向、横方向にどれだけ動いたかを代入しています。
Stage.Draw(Lat,Lng);を説明する前にStage.hを変更します。
#pragma once
/* Stage.h */

class STAGE
{
public:

	struct
	{
		int Type[STAGE_MAX_X][STAGE_MAX_Y];
	}Chip;

	void Read()
	{
             //省略
	};

	void Draw(int Lat, int Lng)
	{
		int pic = 0;

		for (int y = 0; y < STAGE_MAX_Y; y++)
		{
			for (int x = 0; x < STAGE_MAX_X; x++)
			{
				switch (Chip.Type[x + Lat][y + Lng])
				{
				case 0:
                                     //省略
				DrawGraph(CELL * x , CELL * y, pic, FALSE);
			}
		};
	};

private:

};

STAGE Stage;Lat,Lngを引数にとり、その分だけステージを移動させています。
つまり、Stage.Draw(Lat,Lng);ではStage(X方向に動いた距離, X方向に動いた距離)としています。
最後にmain.cppに追加していきます。
#define //省略

enum COURCE
{
    START,
    WORLD,
    FIGHT,
};
int Scene = COURCE::START;

#include <DxLib.h>
#include <iostream>
#include "Picture.h"
#include "Sub.h"
#include "Title.h"
#include "Stage.h"
#include "PlayerDraw.h"

int WINAPI WinMain(
    _In_ HINSTANCE hInstance,
    _In_opt_ HINSTANCE hPrevInstance,
    _In_ LPSTR IpCmdLine,
    _In_ int nShowCmd)
{
    ChangeWindowMode(TRUE);
    DxLib_Init();

    /*Window初期化*/
    //初期化

    Picture.Load();
    Color.Load();
    Font.Load();
    Stage.Read();

    while (ScreenFlip() == 0 &&
        ClearDrawScreen &&
        ProcessMessage() == 0 &&
        GetKey() == 0 &&
        Key[KEY_INPUT_ESCAPE] == 0
        )
    {
        switch(Scene)
        {
        case COURCE::START:
            Title.Draw();
            break;
        case COURCE::WORLD:
            PlayerDraw.RealScreenDraw();
            break;
        };
    }

    DxLib_End();
    return 0;
}
PlayerDraw.hをインクルードして、PlayerDraw.RealScreenDraw関数で表示しています。

実行すると無事動きました。まだ、当たり判定を作っていないので海の上でも進んでしまいます。
これでプレイヤーの表示,アニメーションの説明を終わります。
プレイヤーの当たり判定
次にプレイヤーの当たり判定を作っていきます。
一度、当たり判定の仕組みをまとめていきます。「プレイヤーの位置のマップチップの取得→川や海だったら→前の位置に戻す」簡単ですね。では、コードにしていきます。
#pragma once
/* PlayerDraw.h */
#include <windows.h>

class PLAYER
{
public:
	void RealScreenDraw();

	int loopNum = 0;

	int PicMode = 10;
	int dir = 4;/* 1はUP,2はLEFT,3はRIGHT, 4はDOWN */

	struct
	{
		int PicMaxU = 2;
		int PicMaxL = 5;
		int PicMaxR = 8;
		int PicMaxD = 11;

		int PicMinU = 0;
		int PicMinL = 3;
		int PicMinR = 6;
		int PicMinD = 9;
	}AniFla;

	int Lat = 0;
	int Lng = 0;
	int PrevLat = 0;
	int PrevLng = 0;

	void BackScreenDraw();
	void Move();
	void MoveAnime();
	void CheckCIE();

private:
};

PLAYER Player;

void PLAYER::RealScreenDraw()
{
	Move();
	BackScreenDraw();
};

void PLAYER::Move()
{
	if (Key[KEY_INPUT_UP] == 1 || Key[KEY_INPUT_W] == 1)
	{
		dir = 1;
		Lng--;
	}

	if (Key[KEY_INPUT_LEFT] == 1 || Key[KEY_INPUT_A] == 1)
	{
		dir = 2;
		Lat--;
	}

	if (Key[KEY_INPUT_RIGHT] == 1 || Key[KEY_INPUT_D] == 1)
	{
		dir = 3;
		Lat++;
	}

	if (Key[KEY_INPUT_DOWN] == 1 || Key[KEY_INPUT_S] == 1)
	{
		dir = 4;
		Lng++;
	}
};

void PLAYER::MoveAnime()
{
	switch (dir)
	{
	case 1:
		if (PicMode == AniFla.PicMaxU || PicMode > AniFla.PicMaxU || PicMode < AniFla.PicMinU)PicMode = 0;
		else PicMode++;
		break;
	case 2:
		if (PicMode == AniFla.PicMaxL || PicMode > AniFla.PicMaxL || PicMode < AniFla.PicMinL)PicMode = 3;
		else PicMode++;
		break;
	case 3:
		if (PicMode == AniFla.PicMaxR || PicMode > AniFla.PicMaxR || PicMode < AniFla.PicMinR)PicMode = 6;
		else PicMode++;
		break;
	case 4:
		if (PicMode == AniFla.PicMaxD || PicMode < AniFla.PicMinD)PicMode = 9;
		else PicMode++;
		break;
	}
}

void PLAYER::CheckCIE()
{
	int Chip = Stage.Chip.Type[8 + Lat][9 + Lng];

	if (Chip == 0 ||
	  Chip == 1 ||
	  Chip == 2 ||
	  Chip == 15
	  )
	{
		Lat = PrevLat;
		Lng = PrevLng;
	}
};

void PLAYER::BackScreenDraw()
{
	CheckCIE();

	MoveAnime();

	Stage.Draw(Lat, Lng);
	DrawGraph(8 * CELL, 9 * CELL - 4, Picture.Player[PicMode], TRUE);
	Sleep(0.12 * 1000);

	PrevLat = Lat;
	PrevLng = Lng;
};
変数PrevLat, PrevLngは当たり判定で前の位置を必要とするため、新しく作りました。
当たり判定をするCheckCIE関数を作りました。
Chipに「座標+動く距離」のチップを代入します。そのあとif文でチップが海や岩、川ならもとの位置に戻す処理を書きました。
あまり難しい部分はないです。

成功しました。岩に当たると動きません。
まとめ
今回は、プレイヤーの表示,アニメーション,当たり判定をつくりました。
次回は敵との戦闘を作っていきます。
最後まで読んで頂き、ありがとうございました。ツイッターもやっているので確認して見て下さい。


コメント